Saturday, February 23, 2013

The B Dress: Finale (Picture Heavy)

My Designer "Knock-off"
Back in January, I found this fabulous picture inside InStyle Magazine:

 And I just couldn't get it out of my head...
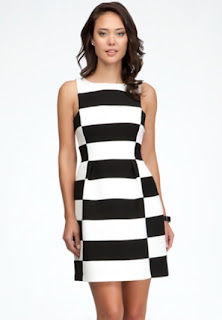
Then readers alerted me to the "bebe boatneck striped dome dress":

Whoa!! Nearly identical to my dress, but the back of mine (like the Lanvin Resort 2013 dress) was way more exciting with the full exposed zipper...
Since I added 3" to the length, making the zipper "short"
I left the center back seam open as a "vent".
 
Lanvin... I thought this zipper looked awful!


In the end... I made the dress that I wanted, the one that works for me. I didn't want the double-black stripes in center front, as I thought it made the model's hips looks wider...
While on "trend" with the black and white "bold graphics", I actually enjoyed the challenge this dress brought, with creating fabric strips and matching them all around. I'd never done an exposed zipper before, and the added challenge of this being a contest entry was a big motivator to see it through to the end.


Lanvin Resort 2013 Dress: $3730 at Bergdorf Goodman
Bebe "Boatneck Striped Dome" dress: $170 at bebe.com and Amazon

My Version: Stretch Poplin in "Caviar" and "Papyrus" $22, Posh Lining $6 (both from Joann's), and Satin Zipper (33") from Botani in NYC (thank you, Ann!) $16
Grand Total: $44
The confidence gained from completing this project: PRICELESS! Just look...
Don't Mess with the B!


Monday, February 18, 2013

B Dress, Part 3

My, oh my! Thanks so much for all the kind words! Yes, it's coming together and whenever you can start to see your project take shape, it feels good!  Sorry for going MIA, but other responsibilities called (you know, that whole wife, mom, teacher thing I have going on...), and I just kept working away in small increments, 30 minutes here, 30 minutes there.

I put the back together the same way as the front, but it was easier to match the stripes since the curves weren't as extreme. I joined the front and back together at the side seams, but didn't touch the shoulders (you'll see why shortly).  I assembled the lining completely (so much easier with no fabric to create and stripes to match!) and quickly, using a "Posh Lining" from Joann's. I  hemmed the lining, and stabilized the center back openings of the "fashion fabric" layers with a 1" strip of fusible interfacing (for the installation of the exposed zipper later).
Time to marry the layers! With right sides together (and shoulder seams open), I pinned and then stitched the 2 layers together, from center back bottom hem, up the center back, along the back neck. I folded over the lining layer 5/8" at the shoulder seam (to be closed later by hand), and skipped over the shoulder, starting the stitching together again around the armhole (skip the shoulder), around the neck front (skip the shoulder), around the armhole (skip the shoulder), to back neck opening, then down the center back again to the hem.  I trimmed the seam allowances, and snipped along the curves, then pressed all those nice clean edges.  Now, I was ready to stitch the shoulder seams, closing the lining by hand there...
I hemmed the dress by hand, using ivory thread and black thread in their respective locations, and anchored the lining to the dress hem at the side seams.  I've taken such great care with this project, it's become a labor of love, and I can't remember the last time I paid such close attention to detail for a garment for myself! (NYC Chanel Jacket - Sit & Sew with King and Khalje, probably!!!)
Time for the "Piece de Resistance": The Zipper! From the beginning of this project, I knew that The Zipper was key. It needed to run the length of the center back and be magnificent. I can't thank Ann enough for volunteering to pick up the perfect zipper in NYC for me! She did a marvelous job, and sent me the most amazing black satin zipper from Botani. It's 33" of black satin fabulous, with nickel teeth. Freaking Awesome.
I basted it down by hand, and the machine stitched in in place, with the top wrapped over the back neckline and anchored inside. Since I added 3" in length to "my version", the zipper is 3" too short, so I left the center back seam open at the bottom, like a vent.

It's done! It's finished! It's fabulous!  Now to get the photo shoot done so I can submit my entry! I'll be back soon with those pics... I'm so happy with this dress, I don't even have words. Woo hoo!!!

Sunday, February 3, 2013

Super Sew Day! (B Dress, Part 2)

I think that I got more accomplished on sewing projects today than I have in a long time! Along with getting the kids rooms cleaned up, a little laundry, and writing a math test, I'd say it's been a very productive day!

I cut out the pattern for a dress I'm making for my sister. Family wedding in June, and it's been about 20 years since I last made her a pretty dress.  She chose Vogue 1302, so I've got to work up a muslin of the lining, and send it along to Utah, along with the muslin for my niece's dress, too. I'm a sucker for making pretty dresses, what can I say?
Line Art
Then I had a few embroidery orders to do (supplementing the "fabric fund"!), so I took care of that. A friend is starting work for a new company, and hired me to digitize the logo and create a few sample shirts, so while the embroidery machine was stitching... I started working on The B Dress!

Cut the fabric into 3.5" strips, allowing for 1/4" seam allowances.
Threaded the machine with ivory thread and a black bobbin, and started piecing the strips together.
Sew and press, sew and press, sew and press... I pressed the seams toward the black stripe, as the color will hide the seams better.
I ended up with 2 large blocks of strips, 1 for the front and 1 for the back. I did the stitching 30 minutes at a time, taking a break for other responsibilities (there's that Mom thing I'm supposed to do, too). I think I ended up spending about 1.5-2 hours cutting and stitching, creating the striped fabric of the dress.
Laying out the pattern was really easy, as I knew that the hem would end exactly at the edge of one color, and the side pieces staggered.  My son said, "Mumma! Are you making a racing flag? That would be so cool!!!" Oops, wasn't going for that look either. Gentlemen, start your engines...
I thought to myself, "Wow, this is going pretty smoothly!", which summoned the Sewing Gods to remind me that matching stripes along a princess seam bust curve is not so smooth and easy.  So I took a break, fed the kids (again?!), wrote a math test and watched BeyoncĂ©'s half-time show. Wow. Amazing show. During which I noticed that her saxophonist was wearing a 2 piece outfit IDENTICAL TO MY B DRESS!!! Not kidding. Can't find a pic tonight, but I will show you when I find one!  The break did me good, as I was able to pin the hell out of that curve...
and TA-DA! The front of my dress is done! Yes, it still needs a back and a full lining, but LOOK! Isn't it cute!?
 
It was a great day, got so much accomplished, including printed my first pattern with my Garment Designer software. I will muslin that (just a straight skirt) this week, and share it in a few days!