Tuesday, December 30, 2008

The Challenger Shirt

If you've ever seen "The Bucket List" with Jack Nicholson and Morgan Freeman, then you've seen the car I'm trying to depict as a shirt. It's the yellow one on the right, for those who still don't know. It's a 1970 Dodge Challenger... a loud and fast muscle car.

My FIL spends each summer going to car shows and cruising with other classics. It's his pride & joy, and I can't blame him. You'd never know that it was green and in awful shape when he got it from a police auction. He's done an amazing job restoring it, and maybe my sewing gift will earn me a ride in it, for once!
So, I started with Simplicity 4287, a Threads collection pattern with 3 short sleeve variations for little boys and grown men. Yes, there will be a little boy version in the near future, so Little Man can be just like Papa! The pattern was Out of Print, so I ordered directly from Simplicity (a first) and was very happy with the service. Although it wouldn't have been difficult to slap a stripe on a short sleeve shirt, I really liked the way this panel had a slight curve to it, like the hockey stick stripe on the car.

I ordered the cotton/poly blends from fabric.com, and even though it's super lightweight, you can't beat the price and the free shipping on first-time orders! Why the blend? To prevent the black from leaching into the yellow during washings. Isn't Ann at Gorgeous Fabrics so smart? She didn't have what I needed, but pointed me in the right direction. That's customer service!

I made the XL according to the measurements on the pattern envelope, and the fit is right on the money. My only recommendation for working with this pattern is to cut 2 of the yoke pieces, not 1 as the pattern recommends. Every shirt I've made or bought has a double layered yoke, so I really don't know why the pattern would only use 1.

To topstitch, I used 2 spools of yellow threaded through a single needle (another first for me), and chose a 5mm stitch length. Looks just like embroidery thread, but way neater and faster than hand stitching! Thanks to Summerset for her tips, I used yellow for the buttonholes, but black buttons to tie in the stripe color.

As for my embroidery, I did my test with 2 options. One as a normal filled Brush font (just like the car decal) and another as a running stitch outline. DH and I preferred the cool look of the outline version, but knowing FIL's somewhat poor vision, we chose the solid version for easier reading. Of course, I also had to add his name in a smaller matching font.

He loved his Christmas gift, and it was easy to make. I spent more time mulling over my embroidery decisions than actually making the shirt!


Sunday, December 28, 2008

xmas08

That's the license plate of the truck that just hit me... xmas08. The last week has been filled with wonderful moments, and also some that made me say (and not in a good way), "Really? Really?!" (Gotta love this season of Saturday Night Live...)

Thursday 12/18: Last day of school/work, and expecting a big snow storm and an extra day to get Christmas stuff done at home. One week to go, lots of time to finish my to-do list. No problem. (Insert sound of God laughing.)
Friday 12/19: 8" of snow later, DD and I spent a few hours on her Christmas dress. She sat in front of me and worked the pedal SLOWLY (I didn't know machine could go that slow without stopping!), pausing to remove pins, and keeping the edge of the fabric lined up at the 5/8" mark. She also transfered some markings with the water soluble marker, and DH took some video of the momentous occasion (first unaided stitched with a real machine).

Saturday 12/20: Wake up to the sounds of DD sick with the flu. Within moments, DS is right next to her participating also. DH headed off to work ("Call me if you need me...") and it was not a fun day. Laundry, and lots of it. More snow.

Sunday 12/21: Kids slightly recuperated, had Christmas jobs to finish for clients. Very little "fun" sewing. More snow, probably over a foot at this point.

Monday 12/22: I wake up with the flu. Really?!? Really?!? Why am I surprised? Entire day wasted.
Tuesday 12/23: Did I mention I wasn't done shopping? DD and I are well enough to fight the crowds at Costco where we fill up the cart with essentials and party staples. Couple more errands, naps (me, too!), and the test stitch out for FIL's shirt. Oh yeah, we were confident it was a 1971 Challenger, but just to be safe we called to confirm, and good thing we did. It's a 1970. If you've ever seen "The Bucket List", it's the yellow car Jack Nicholson is racing.

Wednesday 12/24: Christmas Eve! Yes, I can sew today. Actually, make that, "I HAVE to sew today." FIL's gift should be finished when he opens tonight, and DD's Christmas dress needs another sleeve and a hem. Finishing just in time, both get done and turn out great! (Reviews for another day...) For him, Simplicity 4287, and for her Simplicity 3668. She wanted to copy a dress from "Imagination Movers" that Nina wears for the Christmas party, and we did pretty well. Didn't have the peppermint striped tights, but we did put her hair up!
I return home after the party, leave out cookies, chocolate milk, and carrots for Mr. Santa, tuck the rugrats in, and get to work wrapping. No, I hadn't wrapped a single item at this point. So, at 1:30 am, I crawl into bed.

Thursday 12/25: Merry Christmas!!! DD arrives home a half-hour early from work. A special surprise for the kids? No, silly readers... the FLU!!! (Really?!? Really?!?) The kids arise, and open presents, and Daddy makes it through, then disappears to bed to rest and recuperate. Thankfully, he had nowhere to be that day and we weren't expecting company! Putting toys together and taking care of DH, but no sewing. I did get some sewing tools though, and am eager to put them to work! (Another post, too!)

Friday 12/26: Crunch time. I will be hosting my family (40 people) the next day and the house needs major rehab. Cleaning, cleaning, and more cleaning. Forecast: 60 degree temps tomorrow. Huh? As they say here in Michigan, "If you don't like the weather, just wait a few minutes."

Saturday 12/27: Party time. The family is healthy, the house has been disinfected, and we are ready for guests. Being the last of 9, and having all but one sibling not live in the area, this crowd is immediate family: Brothers, sisters, nieces, nephews, great-grandkids, and this year a good number of "significan others". It was a great end to a horrible week, and now I sit in my peaceful home, looking out the window at green grass, and wondering what's in store for 2009...

My next sewing project is to finish a shirt for DH that was supposed to be a Christmas gift, but got postponed too far back. It's BWOF 9/08 #145, and just needs sleeves and a hem. So, I'm headed downstairs to make that happen, then it's onto something fun. I think I've earned it! I hope your Christmas was smoother than mine, and that you had a chance to do some "fun sewing". Happy New Year!

Monday, December 15, 2008

Almost There...

Okay, here is the almost finished FIL "Tribute to the 1971 Challenger R/T" shirt. It matches the car, but needs a couple things...
1. Buttons. I bought black, but am having a brain fart. Black buttonholes, right? Or, yellow?
2. Embroidery. The original plan was to stitch the car on the front left chest, but the placement of the yellow/black seam is right where the design should go. And, the design I found isn't exactly his make/model. So, here's my idea: Embroider (in a script like the car decal) " Dodge Challenger R/T '71" on the black, running vertical up along the black/yellow seam, in silver thread. Or yellow?
The pattern is Simplicity 4287, a Threads Magazine Collection (out of print) pattern. Can't remember how I stumbled across it, but I ordered it from the Simplicity website, and they had one in stock! It's exactly what I was looking for: something with a little retro vibe and the stripe built in. You can't tell from the picture, but to topstitch the front seam (and back yoke), I used two spools of yellow thread running through the same needle. Great effect, I'm really happy with it!
Can you say "indecisive"???
The next project is DD's Christmas dress. I have red panne stretch velvet, and will use Simplicity 3668, the short sleeve dress version. I want to add a sash and bow in the front, where the pleats meet the yoke, and found 3 options. Candy cane striped cotton, Grosgrain striped ribbon, or sparkly candy cane organza. Opinions??? I also plan on lengthening the sleeves.
I'm exhausted. It's been crazy getting the holiday decorations up and winding up this last week of work before 2 weeks off. The embroider work continues to keep me too busy, so I'm really looking forward to having time off work to sew some fun projects! And, my sewing area is all re-organized and cleaned up. So nice having it all in one area, much less back and forth, and way less clutter.
Hope you are all doing well. With all the wild winter weather, my sewing friends in the Northeast have been in my thoughts. Hope you are all safe and warm!

Saturday, December 6, 2008

Distractions!

Nothing new created this week to share, and yet, I have been busy sewing!? How did that happen?

1. The embroidery side business sends is averaging about 5 items each week. Some require logo designing (time spent at the computer searching for the right picture, choosing the right font, spacing the designs correctly) and some can go directly to the machine (stitching the "rough draft" to make sure it's right, and then stitching out the final version). This week it was polo shirts for the Theatre Staff at school (easy) and a chef jacket for a colleague. The chef jacket was fun, she wears a cap made of a cotton "skull and cross bones" print, so she wanted a matching skull on the jacket and her nick-name. Would you take food from a chef wearing a skull and crossbones logo? Hmmmm..... Actually, she's a great cook, and if it makes her smile, who am I to care? The jacket also had a pocket added to it, and it was my first welt pocket and I used the illustrated instructions from the Spring 2008 SewStylish magazine (p. 47). Came out great!

2. I hemmed 2 pairs of jeans for my father-in-law, and patched a ripped back pocket. If they made a machine just for denim (you know... that part of the hem that has a flat-felled seam and when you fold it over and sew, your machine actally growls at you?) I'd be at the store in a heartbeat.

3. Three more fire department shirts needed embroidered names and titles. Can't complain about that, they put cash in my pocket and pay for my fabric addiction!

Today I was planning on making my FIL a shirt for Christmas. It's a short sleeve button-down that will match the 1970 Dodge Challenger he restored and takes to shows all summer long. The fabric is all cut out, the pieces are all pinned and ready to sewn, but the serger needs to be rethreaded before I start. Not a big deal, just a 2 minute job. But, first I'll need to find my machine. Have I shown you my sewing area?


Yes, it's a mess. Actually, mess might be an understatement. Here's what happened... (Honey, I know you're cringing that I've shared this mess with others, but really, it's okay. They understand that with sewing comes mess and that disorganization is actually a sign of true genius. Really.)

My "sewing table" is the pool table. It's always covered in bags, thread, patterns, my "toolbox", fabric, etc. It's such a waste, we decided to sell it. So, last night I cleared it off, uncovered it, and grabbed the camera to take some pictures of it. You know what happened. Such a beautiful table. Why don't we play it more? I hate to sell it. The kids will be older and hanging out in the basement with their friends and we'll say, "We used to have a pool table, but my sewing crap kept it out of reach, so we got rid of it." So, the sale is on hold, and my job is to get organized. Which starts in a whole other room... to clear space to make a new home for my organized sewing stuff (blank shirts for embroidery and boxes of fabric), so I can shift my tables together. This all happens at a very good time since I'll be hosting my enormous family for Christmas dinner. The cleaning had to happen, the pool table will get used, and the chaos will disappear. Meanwhile, there's the usual 18 loads of laundry, the 2 rugrats to play with, the Christmas tree to decorate...

So, if you'll excuse me, I have a lot of work to do. By next Saturday I should have some pictures of a new and improved sewing space and a rockin' canary yellow and black short sleeve mens shirt!

p.s. Dawn, Bunny, Summerset, Lindsay and other sewing friends: I'm so incredibly JEALOUS of your productivity, there are no words for it. Keep up the good work, and I wish I could do so much with so little time. You are all amazing!
Here's the photo of our staff wearing the teal shirts I embroidered. Katie's Day was a big hit!

Thursday, November 27, 2008

My First Sweater!

After seeing all the cute sweaters that Dawn makes, I've been wanting to give it a go. So, I bit the bullet, picked up Burda 8028 and 2 yards of sweater knit from Gorgeous Fabrics. This was so easy, I know I'll me making more sweaters! I cut into the fabric this morning, and had wore the sweater out the door at 2pm to Thanksgiving dinner! Here's what I ended up with:The Burda pattern has 4 different collars and 2 different lengths, so I opted for collar B and length D. I didn't use all of the 2 yards, but came pretty close. It only required 4 pieces: front back, sleeve and collar, so that was pretty simple. My sewing table looked a little like a cocker spaniel exploded as the chenille created lots of little yarn pieces floating around. The vacuum was used twice in the construction of this single sweater!


The pattern instructions were great, and I used my serger for nearly the entire project. Preparing the collar, attaching it, and hemming the sleeves required my regular machine. One word of warning: a pleated sweater knit collar is bulky and requires patience. I broke 2 serger needles today (I think from pulling too hard on the knit as it was exiting the serger) during the pleated collar fiasco, but I should know better. The pattern runs a little big, so cut on the small side. I cut my normal Burda size and could've cut a size smaller. Also, if you choose to go with length D like I did, you may want to add a couple inches in length. I cheated and serged the edge, but didn't actually hem it, because I like the length exactly where it is. Shhhhh, don't tell.


*Note: This sweater knit is very drapey, so the collar doesn't fold and pleat like the pattern picture, but it still lays nicely and is comfortable, not constricting.


The sweater knit is fabulous. I have to admit, when it first arrived I thought, "Bathroom rugs? When did I order bathroom rugs?) but it's so superbly soft, I quickly knocked the shaggy ideas from my head to forged ahead. Yes, it's messy to work with, but it's so freakin' soft... with the collar style I chose, it made me feel like I was totally wrapped up in my favorite fuzzy scarf.


So, if you're looking to try sweater knits, go for it! And this pattern is a winner, I'll definitely be using it again!


On a side note, I've been MIA for a couple weeks with other responsibilities. Embroidery's been a biggie, and I had a special project that had top priority. I work with an amazing lady that I've actually known for 20 years (she was my world history teacher when I was in high school) and she's been diagnosed with ovarian cancer for a second time. Last Friday, the staff showed her our love and support by wearing teal, the color for Ovarian Cancer Awareness. I volunteered to make staff t-shirts honoring her, and she also requested a special shirt of her own. 30 t-shirts later... we raised over $600 from staff and student donations towards Ovarian Cancer Research, and shared a very special day with a very special lady. Below, you can see the shirt I made her and the shirt I made for the staff. We wore our hearts on our sleeves...

Friday, November 14, 2008

McCall's 5662 - diy style

I'd seen a positive review of this top by Erica B, so I gave it a shot using this knit I purchased through the co-op. If you love the fabric, it's also available for sale at Gorgeous Fabrics.
The print makes it hard to see the details, so here are the features of the top.

1. V-neck overlap
2. Small gathers right and left of center front, both above and below the fitted mid-section.
3. 3/4 kimono sleeves gathered into cuffs.
4. The "V" has good coverage (i.e. no camisole required, in my opinion).


It's comfortable without being dowdy (my dressform isn't doing a great job of selling that point, is she?) and I love that I will be able to wear it with black, brown and white (after Memorial Day, of course!).

The only alteration I made was to take in the mid-section and additional inch on right and left sides, as the fabric was stretching too much. Not only was it too big in the waist, but there was no need for gathers!

This is a close-up of the mid-section, so you can (kind of) see the small gathers left/right, above/below the fitted waistband.

The back is full coverage, no gathers anywhere. Other versions in this pattern have more open backs, and I will definitely use this pattern again in the summer!

I might still shorten it, but need to try it on with skirts and pants before I decide.

Here's my review on PR.


Pleating on the Copper Dress

Reading the instructions that BWOF provides can be a real adjustment for any "visual" person, like myself. It takes me a few read-throughs, then a few more with fabric in hand before I'm ready to stitch, so I thought this visual pleating procedure might be helpful for anyone trying this pattern. Keep in mind that I didn't use a woven like the pattern recommended, so I used fusible interfacing to "lock" the knit in place, then I proceeded with the pleating instructions.

The Burda instructions read:
"...mark 7 lengthwise pleat folds on wrong side of fabric pieces for waist sections. Space first (top) fold 4cm from upper lengthwise edge of fabric piece, then mark 6 more folds, spaced 3 cm apart. There should be 5 cm left at bottom edge of fabric." I have extra space at the bottom because I wanted to work with a larger piece, and trim it down after all the pleating was finished.


"Use a fine needle and fine sewing thread to transfer fold lines to the right fabric side with basting stitches."


"Press all folds (on right side of fabric), except for the top fold, and baste exactly 1 cm from each fold edge with small hand stitches. Press folds down." Here's where I strayed... I can't stand handstitching, so I used my machine. Most of the stitching is hidden, but if I had to do over again, I would've sucked it up, and done the hand-stitching to really make the work invisible. I pressed them all, including the top one.


"Press top fold and lay downward over basting of second fold." I stitched on the wrong side to make this pleat lay flat. Pressing, pressing, and more pressing (especially because this is an interfaced knit) is how I ended up with such a nice, flat result. And, you have to do all these steps twice... once for the front panel and again for the back.


I've gotten some wonderful feedback on this dress, and I don't want anyone to get the wrong impression. I really do like it, and think I need to impose a 24 hour waiting period on posting after completing a garment! It's like when you try a new recipe, and do all the preparation and cooking, that by the time your ready to eat, you're tired of looking at it and smelling it, and you're mind plays a little trick on you. "Is it good, or do I just think it's good because I went to all that work making it?" Maybe not... maybe I just hate to cook!

Monday, November 10, 2008

BWOF Dress & McCalls Jacket


I've finished the dress and jacket I'll be wearing to my nephew's wedding next weekend. I'm happy with the outcome... not thrilled, but happy. Why not thrilled? I should've adjusted the hem of the jacket to account for removing the ruffle, and while I like the front of the dress, I'm not crazy about the back and I can't get the hem to lay flat. It's times like this when I wonder... maybe I should've just gone shopping instead. When I came out to model it for the fam, DH said "I don't like the jacket" and little Miss D echoed, "Me neither, Mom." Well, gee... thanks. Love you, too...

Anyhow, the dress came together well. It's BWOF 09/2008 #132. The instructions were good, the pleating was a PAIN IN THE BUTT. Next time I post, I'll show you details, but for now I'll just say it was time consuming. Part of the problem was that the pattern called for satin for that mid-section, but I couldn't find any to match the copper silk jersey I'd already purchased. So, I used fusible interfacing and pleated the knit as if it were a woven. It's a perfect match, but a tad on the bulky side. I really like the center front and center back gathers, I little place to hide some baggage without the maternity look.
Want a good laugh? Can you believe the bodice was supposed to be split all the way to the pleated band? Are you crazy? Heeeeeeelllllllll no. Stitched that sucker up, pretty darn quick.

I also shortened the dress to knee length, and used a knit swimwear lining under the skirt, but used the left-over silk jersey for the bodice lining. Oh, and I skipped the zipper. Yes, you read that correctly, I skipped the zipper. When I realized that the knit midsection allowed me to slip into the dress without opening the side seam, I got really lazy, really fast. And I will admit, the thought of putting a zipper into all those pleats made me a little nervous (all that matching and all that bulk).
The jacket was the bolero version minus the ruffle. In my previous post, I got some fabulous feedback and decided to keep it simple and let the fabric do the talking. Well, I should've extended the hem to produce a little more coverage, I feel like the jacket is pretty much 2 sleeves and a back! It will serve it's purpose of covering my arms during the 40 degree day, and will probably be shed when the dance floor opens at the reception! I lined the bolero with some copper dupioni. I like to think I'll wear the bolero with other things, but all I can hear in my head is Chris Farley in "Tommy Boy" singing, "Big guy in a little jacket"... I really need to step away from the Halloween candy.

Anyhow, that's my story and I'm sticking to it. Once I've purchased the proper footwear, apply makeup and curl my hair, I'll share pics that don't intentionally chop my head off. Promise...

Tuesday, November 4, 2008

I Need Your Advice...


My nephew's wedding is next weekend, and I'm having some issues with my outfit!


My dress is underway, so that's not the issue. I'm making BWOF Sept. 2008 Dress 132, and I'm using a gorgeous copper silk jersey. I love this fabric, it's so soft and silky, but I have to admit... If chiffon is like sewing on air, then silk jersey is like sewing with water! I shortened the dress to knee length, and fell in love with the color when I saw it everywhere this fall!


Anyhow, the weather here in Michigan is unpredictable, and I've bought fabric to make a jacket to wear with the dress. This fabulous hand-painted silk dupioni (both fabrics came from Haberman's Fabrics in Royal Oak, Mi purchased at the American Sewing Expo this year!) is a perfect match, but I'm not quite sure what style jacket to make.


Option 1. A Bolero using McCall's 3033. I like style C.


Concerns: Will the edge ruffle compete with the pleated waistband on the dress? And, I'd like to be able to wear this with more than this dress (dress pants or jeans), do you think it would work?

Option 2: Use a different jacket/shrug pattern. I have 2 yards of 54" wide silk, and my body style (pear) combined with this gathers on this dress make me think I need to choose a shorter style that will end at the waist or above. FYI: the skirt joins the pleated waistband at the waist. Maybe a Chanel style neckline (no lapel) with a shorter hem and sleeve length?

Option 3: Forget the painted silk, and use a black suiting from the stash to make a jacket.

Keep in mind I have 10 days to get these pieces done! The dress is going well, so I'm not too worried about that. I should be ready for the jacket by this weekend.


Any and all ideas are welcome... please help me decide the right style to complement the dress and the fabric!

Saturday, October 18, 2008

The Fabric Co-op

I first found out about Fabrics and Notions from the discussion board at Threads Magazine.
Basically, a few ladies work together out of the basement of one of their homes to organize photographing, posting, selling and shipping fabrics and notions. They are located near a mill that produces very high quality fabrics, many from designers like Liz Claiborne. Dawn has posted about the quality of the goods, too, and yes... It's all my fault, I dragged her into their hands, too!!! Click here to see her post.

I've found the same fabrics on other websites for a lot more money, which makes me feel great about the quaility and the savings I'm getting, but there are a few drawbacks.

1. They only ship once every other month, so you can't be in a hurry. They are seasonal (at the end of summer wools and coatings were posted), so even though my order was placed a month ago, it will still arrive in time for me to make and use the garments.

2. You don't always get what you order. Sometimes they have a limited amount available and sometimes enough has to be ordered to fill a bolt. In the case of needing to meet minimum, they have posted the status and asked ladies to change they're color or add to their order to get the fabric for the group. I've missed out on a few fabrics, but also ended up getting one by other ladies filling the bolt (Yay!).

3. There are times of chaos and disorganization, but keep in mind that these ladies are passing the discount on to us, and get no pay for their work. So, you must be patient, this doesn't operate like a fabric store. There is give and take when quality fabrics are sold at reasonable prices!

My experience overall has been a very good one. There's this dress, and this dress, and this skirt. The quality is good, the photos pretty accurate color, and customer service is good also.

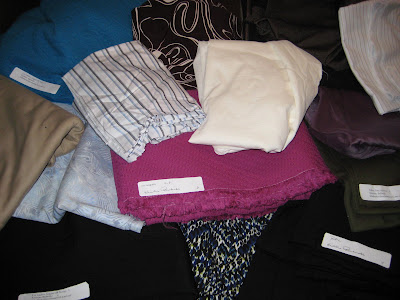
A huge array of fabrics are posted each month of many types (velvets, denims, cottons, silks, coatings, flannels, childrens) so beware, you'll love a lot and spend a lot! I didn't realize how quickly my "few yards here, few yards there" added up! Right now, I'm on a fabric diet, and have refused to open the picture files to see the new fabrics ("out of sight, out of mind") or buy anymore for the time being. (Did you see the picture at the top???) I do check in to read what's offered, just in case something special comes through. They also do notions buys from time to time (needles, zippers, elastic) but I haven't done anything with that (Search FabricsandNotions2 at Yahoogroups).


The Joining and Buying Process

1. Go to http://www.yahoogroups.com/ and register or sign in if you're already a member. Here's the link: http://groups.yahoo.com/group/FabricsAndNotions/

2. Post and request to join the group, and then post an introduction message to get "unmoderated" and receive all the messages.

**This is where you have to decide what messaging works best for you. I get a digest, which is messages in batches of 25. There are hundreds of members, and everytime they post, a new email is made, so you're mailbox can fill up in minutes. Or, you can just check into the Yahoo Groups page and read the messages there on your own time.

3. Ressy is in charge, and known as the Evil Fabric Queen (why? because when she waves her magic wand, watch out! You'll fall under her spell and feel the need to buy lots and lots of fabric!). When she posts "New Fabrics" there will be a link to a photo album where you can see pictures and descriptions of the fabrics and their prices. These aren't usually bargain basement prices, so this isn't really a money saver in that respect. But you will see great fabrics at lower prices than other online fabric stores. Occasionally, she'll get a great deal on something (muslin was a recent one), and it will be a super awesome price, but you have to act fast. Again, there are hundreds of members across the country.

4. When you see something you want, you open the database for that fabric at the main Yahoo Group page, and add your record of which fabric and how much you want. Time is limited, though, usually a few days or a week, then it's done and closed.

5. When that sale closes, Ressy will remind everyone to check their records.

6. Payment can be done by snail mail or Paypal. Include a little extra for shipping.

7. When it's time for a shipping, another message will be sent for you to verify your order and payments. This is where you may find out that you didn't get a fabric you ordered. In that case, you'll have a credit on file, and can apply it to another future purchase. If you're paid up, then your fabric will arrive a few days later, with each one labeled by name and yardage.

If you get stumped, you can either email me or post to the Yahoo group, and you'll get fast help! Becky and Liz are Ressy's helpers, and they are great!
Now, if you'll excuse me, I have a large pile of fabric to make into jackets, shirts, dresses, pants...

Saturday, October 11, 2008

The Homecoming Dress

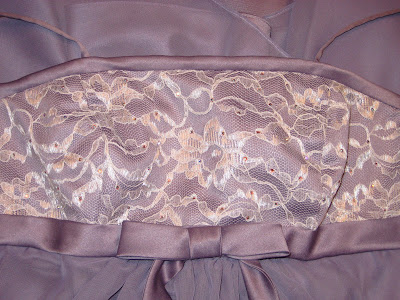
This department store dress was brought to me to recreate in purple. The client liked the design style and fit, but not the color. I've never copied RTW before, but felt confident that by using a combination of patterns and my own skills, I could complete the project in the 3 weeks provided.

McCalls 5623 was used for the bodice, which was nice because it offers fitting options for different cup sizes. The RTW dress was a size 4 and the cup was too big, so I was very glad to be able to accomodate her in that area! The RTW dress also had a bias cut underskirt, so I used McCalls 5100 for that part, with modifications. I needed a flat upper skirt edge, and extended it the required amount to obtain the necessary length from waist to bust. I also used the muslin to determine the correct size to cut. As for the chiffon overskirt, with only gathering in the CF and CB, I used 1.5 yards of 60" wide chiffon, and drafted that part myself.

The bodice was constructed first, basting the lace pieces to the underlying satin, then stitching the bodice together. An additional bodice of just satin was made for the lining. Because the top edge would be wrapped in satin (I thought the RTW top edge was piping, but it wasn't), I basted the two bodices wrong sides together.

The bias skirt was then constructed of satin, but CB seam left open for the invisible zipper. I stabilized the CB skirt edges with 1" wide fusible interfacing to prevent stretching with zipper placement. The chiffon overskirt was measured and CF and sides marked, pinned, and gathered at CF and CB. The bodice and skirt layers were then attached to complete the dress body.
The bow and sash were made of bias cut strips (3.25" wide), folding in half, stitched at 5/8", turned right side out and pressed to produce a 1" finished width. The band was hand sewn over the bodice/skirt seam. The bow was hand sewn into place and tacked down to stay open. I then installed the invisible zipper and closed the CB skirt seams separately, so the chiffon was still flow fully.
I used a narrow hem to complete the CB chiffon seam. The top bodice edge seam was then finished with a strip of bias cut satin, but here is where I would've changed a couple of things. I should've made the trim more narrow to better match the RTW dress, and attached the straps at this point. Not a big deal, though...


To add the sparkles, I used the BeJeweler Stone Styler and heat fix Swarovski Crystals from Sue's Sparklers. I placed the crystals randomly, but evenly spaced apart all over the lace bodice. Super easy, and adds a professional flair, the task was tedious, but completely worth it.
A hem, hook & eye to finish the job.

All fabrics were purchased at JoAnn's.

My client is very, very happy, as am I. This project was scary at first, as it was my first attempt at copying RTW, it had been a long time since I worked with these fabrics, and this dress was for the daughter of a coworker. Not only did it turn out great, it's bringing in more business, so it's a win-win for me.

*Yes, I know there's no view of the back... yet. This dress was too tiny to zip completely on my dress form, so when I get pics of The Girl in The Dress, I will update this post!

Coming Soon: Halloween Costumes and a Silk Jersey BWOF dress for a November family wedding!

Monday, October 6, 2008

No, I haven't fallen of the face of the Earth!

Here's a little peek of my progress with the Macy's Homecoming dress...
If you missed the earlier post, I've been contracted to copy a dress for the 9th grade daughter of a colleague. The original was exactly what they wanted in style, fit, and design, but was not the most pleasing shade of green. So, I'm recreating it in dusty purple. This is my first attempt at copying RTW, and it's been 15 years since I did formal wear. I'm using 2 different McCalls patterns, one for the bodice, and the other for the underskirt (bias cut), and self-drafted the chiffon over skirt.
Still to do: install the invisible zipper, finish upper bodice edge (bias cut satin of underskirt), heat fix Swarovski crystals to the lace bodice, make and attach spaghetti straps, and hem.
I'm just buried alive under the papers to grade (did I mention 35 students x 5 classes each day), the almost finished dress, and the Fire Department Embroidery order (13 knit caps and 5 sweatshirts). Oh yeah, don't forget the doggie sweatshirt Halloween costume and the witch Halloween costume (thank God I have 3 more weeks). I have Parent Teacher conferences tomorrow after school, the Homecoming dress must be done for the dance this Saturday...

Ever wish you had the super hero ability to stop time, but keep moving forward yourself????

Anyhow, I miss you all (school computers have now blocked all blog sites, so no peeking at work anymore), and will post lots of pics in the coming days of both the green original dress and my finished product, inside and out! Keep your fingers crossed for me, I need all the prayers I can get!

Friday, September 12, 2008

I waited too long...

Summer's Over... (sniff, sniff, sob)
This very sweet sundress is made of a cotton batik I purchased through the Fabrics and Notions Co-op through Yahoo Groups. There were so many projects already "on the table" when it arrived, it just had to sit and wait patiently, hoping I would get to it before the weather turned.

So, now I have a great red/fuschia/gold sundress with red piping for next spring (unless we get another Indian summer in October, like last year)!


The pattern is Simplicity (threads) 2926, and I chose it for the fitted high waist, pleated neckline (trendy!) and A-line skirt. View D was my guide, but I made many changes...mainly because I had 3 yards of 45" wide, while the pattern called for over 4 1/2 yds of 45" wide!

1. Shortened the skirt to knee length

2. Lined the skirt with broadcloth

3. Eliminated the center front seam by cutting the skirt front on the fold

4. Moved the zipper to the side, and made it invisible (really changed assembly)

I moved the zipper for two reasons: to be able to save fabric by placing center back on a fold, and to give the center back a clean, seamless look. What I didn't realize, was that this also screwed up the piping and assembly process, since I needed to leave the opposite side seam open for installation of the invisible zipper. It's also the first time I've ever worked with piping, and because the side were sewn after, the piping had to be cut and isn't quite perfectly matched in the side seams. I'm not worried about it, though, since I'm not off by much, and it under my arms (weak, I know...)

Eliminating the center front and back skirt seams wasn't as bad, I just had to check the matching seam of the waistband accordingly.

The entire dress is now lined, as the bodice already was, and then I added the skirt lining.

This dress may have a few flaws, but I learned a lot in making these changes and gained confidence in my skills. Now, if only the weather would cooperate...

Okay, if you're still reading, you deserve a funny story about this dress! I obviously really wanted to wear this at least once before next year, so I paired it with a red linen jacket, and walked into the kitchen before leaving for work.

DH: "Can I give you some constructive criticism?"
me: "Sure..." (holding my breath)
DH: "That outfit makes you look fat."
me: "What??? How??? (Removing the jacket) It couldn't be more fitted in the waist, and the top is right on!?"
DH: (pausing) "Oh... well, now without the jacket, it looks completely different. It's a really nice dress, and it does fit you perfectly."
me: mm hmmm.... (trying to be thankful that he won't let me leave the house looking fat)
DH: "Just don't wear it with that jacket..."
Two Weeks 'til the American Sewing Expo!!!
I'm just a little excited, can you tell? This will be my 2nd time at the show, and I'm signed up for some classes. One class is about working with leather, which I've never done but really want to do, and another class is about re-working denim with Project Runway Season 4 contestant Carmen Webber! Along with the amazing finds on the sales floor with the vendors, I can hardly wait!
Coming soon:
A corduroy jumper for the kindergartner, pj pants for DH, and gray dress slacks for myself.

Sunday, August 31, 2008

Just under the deadline...

My Lined Jacket PR Contest Entry ~ McCall's 5477


"Misses Lined Jackets: Semi-fitted, lined jacket, hip length has notched or shawl collar, princess seams, bias side front and side back panels, shoulder pads and center back vent; jacket A has seven-eights length sleeves with upper and slightly flared lower section; jackets B and C have long sleeves; jacket B has bias cuffs."
In a nutshell, I **love** this jacket. It will go with my black sateen skirt and pants I made earlier this month, and the fit is awesome. Sorry you can't tell that from these pictures, but I had to make my dressform model, as no one else was available to play photographer!
Click here to see my review at PR.

Saturday, August 23, 2008

Mini-Wardrobe is Finished!!!

Here's the finished products of my Pattern Review Mini-Wardrobe Contest entry. Two tops and two bottoms that will work great at work! Being a high school math teacher means I need to be comfortable on my feet, moving around the room, and I do a lot of kneeling at students' desks. I needed to use fabrics that were easy to clean, as I use white board markers in the classroom and also have 2 small kids at home that inevitably have something dirty or sticky to touch me with. My other wish for this wardrobe was to make great wardrobe staples, things that were basic enough to work with lots of other pieces, but not too boring either!


Above are the original pictures of the outfits that I created. I'm still new at manipulating and creating jpegs (hence, my crappy storyboard and the first picture in this blog entry), so pardon me. I'll have to have some online friends give me some tutorials!

Here at the left is my final piece, Butterick 4230. It's out of print, so if you love it, too bad for you!

I used a creamy ivory cotton jersey from Joann's (actually, all my fabrics came from Joanns except the black cotton sateen from Gorgeous Fabrics) which is really soft and comfy.

I made a few pattern alterations. The reviews all said the pattern was very close-fitting, so I cut the XL, but after attaching the sleeves, realized it was too big. So, I sewed another line of stitching 1/2" in from the sleeve hem to the shirt hem, right around the armpit, and it's much better.

I attached the collar differently, so that the seam allowance would be hidden under the collar, and I left off the ribbon tie. I thought it screamed "HOMEMADE" or "Happy Hands at Home" as Michael Kors says, so I went shopping and found the perfect gold and pearl brooch to use instead.

In conclusion, I'm really happy with all of the pieces, and will continue to sew with a similar minded plan in the future!
Here is a skirt from the July issue of Burda World of Fashion. It's a wrap skirt with side box pleats that open to a slit. I did it up a a blue batik print as a muslin. The second version will be birthday gift for my mother in law.
It's got a nice fit, and doesn't open too much when you walk or sit, so I'm happy with it.