Showing posts with label Simplicity. Show all posts

Monday, September 1, 2014

What was I thinking?!

Under Construction...
I was thinking that I have wanted to make this dress ever since the day I stumbled across it inside InStyle magazine! When I did a Google image search for "Milly, Banana Republic, striped dress" look who popped up all over my screen!

You know that if Zoe Saldana is wearing this dress, that it deserves to be knocked off! Granted, I could buy this exact dress off ebay right now for as little as $50, but I've already purchased the fabric, and feel compelled to complete the challenge!

Fabric: 3 yards of striped voile from Joann's. I found it on the Red Tag Bargain table of all places, but it was exactly the print I wanted (and a great price, if I messed it up). It's a cotton/poly blend, and quite sheer, so I also picked up a couple yards of navy poly lining.

Pattern: Simplicity 4070. I'm planning on wearing this dress to work, so the sundress straps are non-negotiable. I'm using view F, but obviously not including the lace. I needed a semi-circle skirt, and the first pattern I chose (Vogue ????) wouldn't work because the skirt was too full for the 3 yards of fabric I had to work with. So, was perfect, even allowing me fabric to spare after laying out the pattern so the stripes would match!

I laid the pattern out for the skirt on a single layer of fabric, as stripe matching was a priority for me, with a center front seam. I marked my pattern paper with lots of lines 45 degress from the marked grain line. Once I had the first layer cut, I just flipped it over (now right sides together), and matched the stripes, pinning and cutting carefully.
I used the crayons to aid in moving the paper and cutting the 2nd piece, but flipping it directly over was so much easier!


The bodice pieces being smaller, I felt more confident being able to cut 2 layers of fabric and keep the stripes matched. I had about 1/3 yard left over, but may still use it for a band/belt at the waist.

I started assembling the bodice first, matching the stripes at the front had priority, but finding that the side seam matching also worked made my heart sing! When I moved onto the center front seam of the skirt, I paused. The skirt being cut on the bias meant my seams might stretch, and I didn't want anything wavy or wonky at the center front. I cut a strip of sheer ribbon the exact length of the center front seam, and once I had the stripes matched, I used the sheer ribbon as a stabilizer to hold the seam true.  After stitching, a breathed a HUGE sigh of relief... the stripes matched AND the seam was firm! I need to cut away more of the left over ribbon from the seam, as it's creating a small bubble, but I'm beyond happy with my progress!
So, this is where it stood when I made myself go to bed at 11pm last night. I was actually having fun matching the stripes, stitching the seam and checking to see if I had success. Sick, right?! I still have to cut and construct the lining layer, and decide what to do with the waist, as it seems like it needs a band or something... Thoughts?

Monday, December 2, 2013

Fantasy to Reality: Cobalt Dress

When my "Cobalt Fantasy" started, I knew that I wanted a cobalt and black sheath dress.  I couldn't be happier with the final result.  Donna Karan cobalt wool gabardine (2 yards, Haberman Fabrics) trimmed with faux leather (Joann's), this sheath is a marriage of two patterns.  Simplicity 1802 (bodice) and Butterick 5566 (skirt).  I wore it today with my black cashmere (vintage pattern) jacket.
I love the back of the bodice, the deep-v back is so feminine, but not too revealing. No special undergarments required!  The skirt (16) and bodice (14) matched up perfectly with no special adjustment to marry the two together at the bottom of the waistband.  To get a neat finish on the sleeve, I lined it and stitched the layers together at the hem right sides together. Then I turned it right side out, understitched along the hem, and pressed it.  When I inserted the sleeve, I treated the sleeve as a single unit, and used my serger to neaten the armhole seam. Not perfect or couture, but it was less of a headache and just as sturdy with a very clean finish.
I cut the faux leather into 1.5" strips, folded them in half wrong sides together, and stitched them wrong sides together. Stitching the piping in place was easy enough, but made me nervous, as the pattern piece edges were diagonal and I didn't want to stretch it out of shape. I topstitched on the blue alongside the "piping" to help flatten and neaten the seams.  Pressing was done very carefully, as the faux leather didn't care for direct heat!
Look at the matching of the seams with that piping! The invisible zipper is hidden along that side seam, too. There's a fair amount of bumps there, but I managed to insert the zipper without drama on the first try! Please pardon the wrinkles and bumps, these pictures were taken after a full day of work!
The piping on the bodice and the skirt is positioned to point downward, but the center front strip faces left and the trim on the waistband points up on the top and down on the bottom. I can't get over how the leather trim really makes this dress look amazing, and I'm so glad that I decided to use it! I cut about 8 vertical strips, so I used less than 1/2 a yard of the faux leather.

All in all, it's a great dress with professional flair and strong design lines.  I'll be able to get continued use out of it come spring, as it's a light to mid-weight wool with short sleeves. Today a student complimented me and asked if I got my dress at Guess or BCBG. I think that equates to a sewing win!


Tuesday, May 10, 2011

Progress!

With the Communion Dress now behind me (Thanks so much for all the positive comments! You guys are so sweet!!!), I have moved onto the Prom Dress.  This is the 3rd year in a row I've been "hired" by one of my senior girls to custom make their prom dress.  I really like this new "tradition" and look forward to continuing it!  The muslin was nearly a perfect fit (WOO HOOO!!!), so with just a couple inches of added length and a small tuck in the back, I can move on to the fashion fabric!  The muslin went together really fast, so with the adjustments being so minor, I should have this baby knocked out in the next 10 days.  I know you would like a look-see but, you'll have to wait... Muslins are never pretty, and I really want to knock your socks off with the final product!

In the mean time, I got hit with either a cold that won't quit, or a new allergy.  Sore throat last week, draining sinuses that have me constantly clearing my throat, dry cough... yuck! Luckily, I had the most awesome Mother's Day ever to make me feel better!  DH splurged and made me feel super-special with his gift of.... an iPad!!! I'm eagerly awaiting it's arrival, so stay tuned.  Aren't I a lucky girl?  Sunday was also a nice and quiet day at home, so with the prom muslin awaiting the fitting, I got started on my dress for my niece's upcoming wedding.
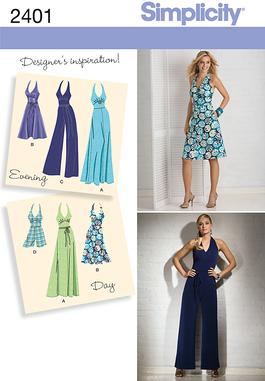
I hemmed and hawed on the fabric and pattern choice, feeling obligated to go solid and long.  But, my heart kept pulling me in a different direction, so I listened to it.  I'm using that awesome red print from my last Haberman's purchase with this Simplicity pattern.
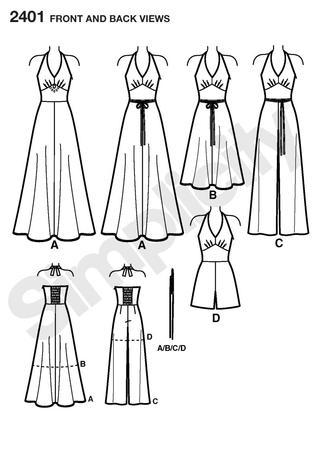
My choice is view B!
I've always loved halter tops, so although it may not be "formal", my sister (Mother of the Bride) gave me her stamp of approval, so I'm moving forward!  The top is done, but needs to be taken in a smidge, then I'll add the skirt and the side zipper.  I'll check in next week with my progress on both dresses!